Ceiling Fan Skin Installation Instructions:
|
Tools you
will need for installing your ceiling fan blade skins:
-
Screwdriver of possibly a
wrench or pliers to remove your ceiling fan blades.
-
Scissors for cutting the skin
sheet into individual blade skins.
-
A sharp X-Acto or Utility knife
for trimming the skin to fit your blade.
-
A Ruler (optional) to help
center the skins on the blades.
|
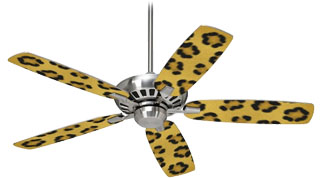
Click HERE to see more ceiling fan skins.
|
Expected Installation Time: 30 to 90 minutes depending on your ceiling fan.
Before
You Begin:
Remove all ceiling fan blades
from your ceiling fan. Clean each blade thoroughly removing all dirt, grease and
dust from the blades. Poorly cleaned blades may cause the skins to come off over
time.
Before you begin installation
make sure the skins will completely cover each fan blade. You should even cover
the areas where the fans mounting hardware fastens to the blade. Covering the
entire blade surface will ensure that your blades remain balanced.
Also note that the skins only
are meant to cover bottom surface of the blade. They do not go on the top
surface (ceiling side) or the edges of the fan bladed.
The skins are made of a high
quality vinyl which uses an AirFREE technology that allows you to easily apply
them and push out all air bubbles.
The adhesive on your skins is
also removable so if by chance you make a mistake applying a skin carefully
remove the skin from the fan blade and try re-applying it.
Important:
Some fan blades are painted or
have a poor quality coating. It may look nice but it may not be bonded to the
surface of the fan blades very well. Even though the adhesive on the skins is
removable (or non-permanent) they still stick very tightly, removing the skins
may remove some of the factory finish from the blade. If this is a concern for
you, please stop now and return the skins from where you purchased them.
Typically we have only seen this with the lower quality ceiling fans. One option
for you may be that your fan blades are reversible so you can apply the skins to
the non-finished or top side of the blade. If you ever decide to revert back to
the original look of your ceiling fan you can simply turn the blades back over.
Some fan blades may be textured. Small or subtle textures are generally fine but
aggressive textures may cause the skins to not adhere well. If you feel that the
skins do not adhere well to your fan blades we do not suggest that you use the
skins.
Installation:
-
Prepairing your skins for installation. The sheet your fan blade skins
came to you on is a single sheet divided into 5 separate skins. Using scissors,
cut the sheet into 5 separate skins on the indicated cut lines. This will make
them must easier to apply.
-
Aligning the skin to you blade. Take one of the skins and remove
the backing paper exposing the adhesive side of the skin. Place the skin in
front of you on a clean flat surface with the adhesive side up. If the skin you
have purchased has a distinct pattern or design where one end of the skin should
definitely be at the tip of the blade, make sure you know which end of the skin
should go towards the tip on the blade.
-
Position the skin on your fan blade. Holding the fan blade slightly
above the skin, position it over the skin where you want it. The skin should be
larger than the fan blade and you should make sure you can see the skin
extending past the all sides of the blade. Slowly and gently set the blade onto
the skin and lightly press on the center of the blade. You want the skins to be
lightly stuck to the blade at this point.
-
Inspect the skin before continuing. Pick the blade and skin up, turn
it over and set it back on table. If the skin is not positioned correctly or you
have wrinkles or creases in the skin gently remove the skins and try it again.
Small air bubbles are fine and will be removed in the next step.
-
Securing the skin to your ceiling fan blade. Once you have the skin where you
want it positioned on the blade you are ready to secure the skin into place.
Using your finger start in the center of the blade. Slide your finger side to
side firmly pressing the skin to the surface of the blade. Continue the side to
side motion and slowly work your way from the center to one end of the blade. If
you get an air bubble trapped under the skin that you cannot remove gently lift
the skin off the blade just far enough to release the air bubble then continue
applying the skin. Now go back to the center of the blade and repeat this
process on the other half of the blade.
-
Trimming the skin. This is where you will need a sharp x-acto or utility knife. Hold the fan
blade with the skins design facing you. Slowly cut into the skin from one of the
edges and cut in towards the fan blade until you reach the edge of the fan
blade. Turn your knife so that you can gently follow the contour of the fan
blade cutting off the excess skin material. You do not have to trim the entire
blade skin in a single cut and is often easier to do it in 4 sections. Trimming
each side of the blades flattest areas first then returning to do the rounded
areas last. Once you have completely removed the excess skin material from the
outside of the fan blade. Locate the mounting hole in the blade. Use your knife
to cut and clear away the skin from these holes so that your mounting screws are
not obstructed by the skin.
-
Inspect the outer edge of the blades skin. You want to give special
attention to the outer perimeter of the skin. Go around the entire fan blade
making sure the skin is securely adhered to the fan blade. If you have a small
spot where the skin is lifted from the surface of the fan blade pres it down
firmly. One small section along the edge could result in the coming off the
blade over time.
Your first fan blade should be
ready. Repeat these steps for the rest of your fan blades then re-install your
blades. That’s it!
|

